Manual measuring of the cylinder no longer necessary
von Jan Breiholdt, Hell Gravure Systems,
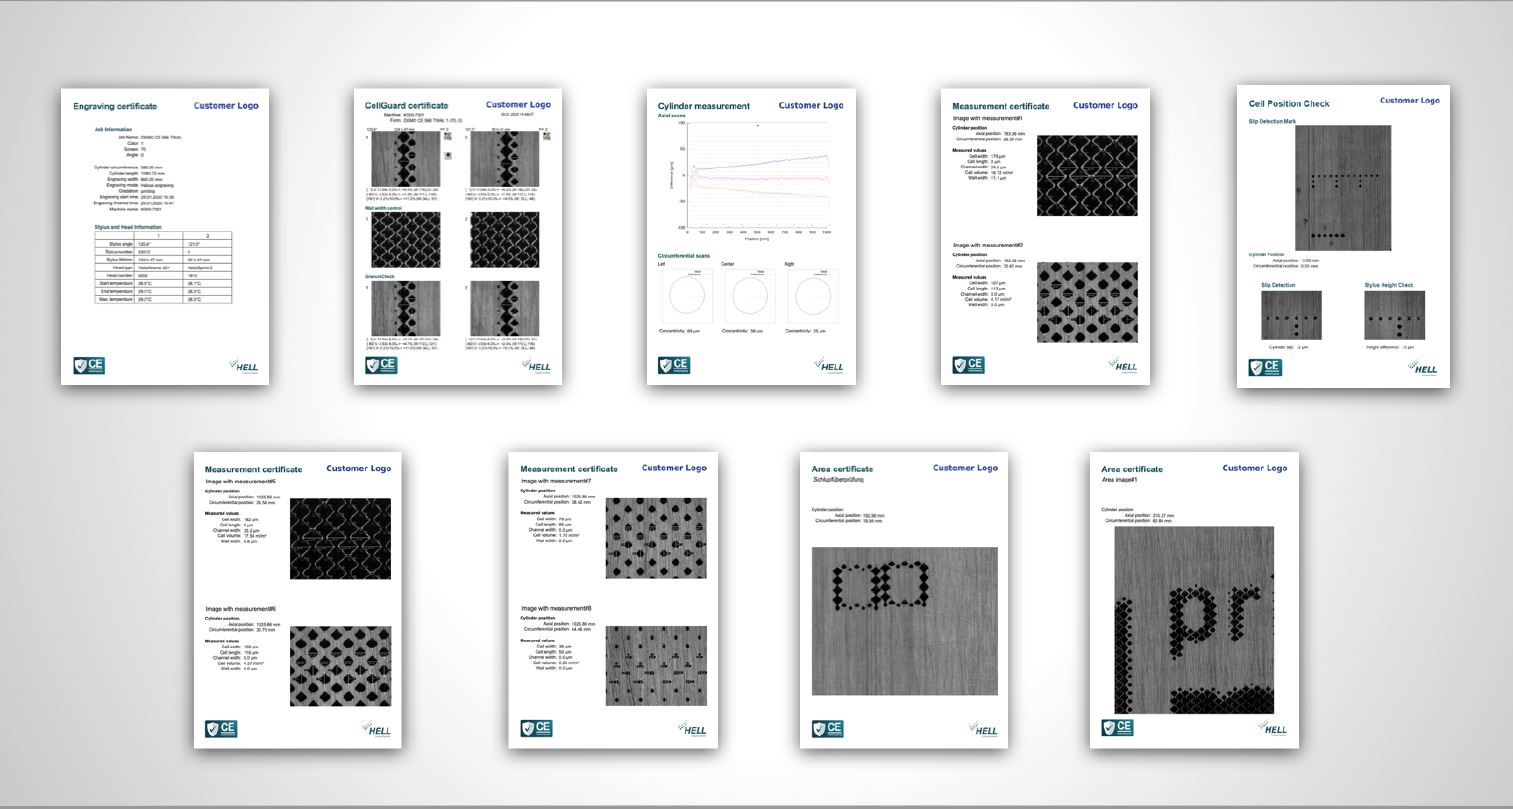
The new engraving certificate
(Source: Hell Gravure Systems)
Thanks to Certified Engraving, current engraving machines have extensive functions for automatic quality control. Modern HelioKlischographs verify the cylinder geometry, measure the engraving and create comprehensive documentation of the engraving. Manual measurement of the cylinder is no longer necessary! This overview explains the essential functions of Certified Engraving.
STEP 1: Verify cylinder geometry
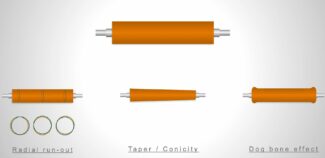
Errors in cylinder geometry can lead to a variety of problems in printing. For example, deviations in density in different 1-ups indicate such problems. Modern HelioKlischographs verify the cylinder geometry with regard to concentricity, conicity and the so-called bone effect, see figure 1. A concentricity error can result from dirty or damaged cones, damaged cylinder axes or dirty hollow cylinder boreholes. In print, this can lead to colour deviations in the print direction. If the conicity is outside the permitted tolerances, register problems arise. The so-called bone effect can lead to deviations in the cell width between the test cut and the production engraving.
Anzeige
Errors in cylinder geometry lead to problems in printing (Source: Hell Gravure Systems)
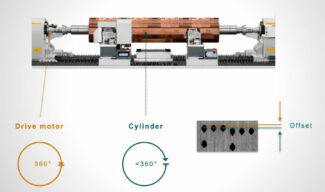
STEP 2: Detect cylinder slip
It can happen that the cylinder slips during engraving. Reasons for this can be dirty, damaged or incorrect cones as well as damaged cylinder axles or hollow cylinder boreholes. Slight cylinder slippage cannot be detected during a visual inspection of the engraving! Current HelioKlischographs therefore engrave special marks before and after the engraving, which are measured with the integrated camera, see figure 2. If the offset value of both marks is outside the tolerance, an error message appears, in an automatic AutoCon line the cylinder is rejected.
Cylinder slippage is caused by neglected cylinder receptacles (Source: Hell Gravure Systems)
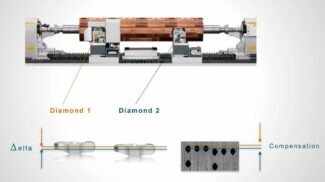
STEP 3: Compensate for stylus height
With multi-channel engraving on the K500 Twain, it is important that the engraving diamonds are at exactly the same height, otherwise there will be an offset between the two parts of the engraving, see Figure 3. Previously, it was the operator’s responsibility to adjust both engraving diamonds accordingly. This could lead to misadjustments. With Certified Engraving, the engraving height is automatically measured before engraving and compensated for during engraving.
Differences in stylus height are compensated automatically (Source: Hell Gravure Systems)
STEP 4: Measure the engraving
In cylinder production, it is common to measure the engraved cylinder manually. This is used for internal quality assurance and, if necessary, also for cylinder docu-mentation for the printer. In future, this work step will be taken over by the engraving machine, see figure 4. In the example, the machine takes measurements in various tonal areas of the blank engraving and logs cell geometries and web widths.
Automatic measuring of the engraving replaces manual measuring (Source: Hell Gravure Systems)
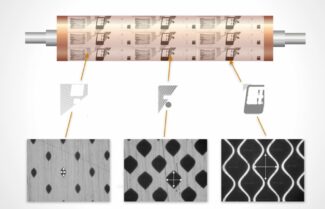
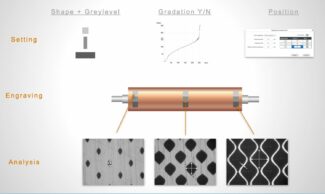
STEP 5: Place and measure control wedges
Another quality assurance method used by many customers is to engrave control wedges, see figure 5. These are placed at the beginning, end or even within the production engraving. Until now, the control wedges were measured manually. With Certified Engraving, control panels can be flexibly designed and positioned on the cylinder as well as automatically measured. A special feature: the control fields can be engraved with or without gradation. This makes it easy to track compliance with the test cut values over the entire cylinder.
Automated placement and measurement of control wedges (Source: Hell Gravure Systems)
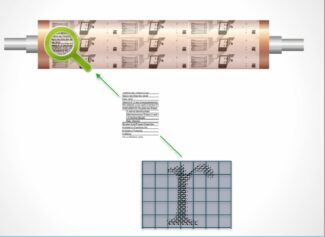
STEP 6: Display engraving areas
Figure 6 introduces the new function “image capture by stitching”. With this function, engraving areas, e.g. texts, characters or logos, are captured by means of a large number of camera images in the axial and circumferential direction and displayed together in one image.
Interesting engraving areas are displayed by means of a large number of camera shots (Source: Hell Gravure Systems)
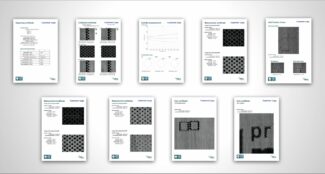
STEP 7: Create customised certificates
All measured values and camera images as well as their evaluations are documented in an engraving certificate, see figure 7. The special feature: Several certificates with different contents can be defined for in-house control or for the printer.
The new engraving certificate (Source: Hell Gravure Systems)
STEP 8: Establish MIS connection
Certified Engraving includes bidirectional data exchange with MIS systems via XML file. On the one hand, it is possible to determine at an early stage which values are to be documented for a specific job or customer. On the other hand, all measured values and camera images as well as their evaluations can be fed back into the customer’s central database.
Summary
Certified Engraving brings many quality-assuring functions directly to the engraving machine and automates previously manual work steps. HelioKlischographs equipped with Certified Engraving verify the cylinder geometry, measure the engraving and create comprehensive documentation of the engraving. Bidirectional data exchange with MIS systems is possible.